Skip to content

Reviews

How to Measure Walk In Tub Clearance for Installation?

Planning a safe bathroom begins with accurate walk in tub clearance measurements. The tub may fit between two walls, yet the door, walker, or caregiver may not. Measure the complete route, including the hallway, bathroom entrance, and turning area. Record wall-to-wall width, finished floor length, door swing, drain position, and nearby fixtures. Use a steel tape, not a flexible ruler.

The Centers for Disease Control and Prevention reports that one in four U.S. adults has a disability. AARP’s 2021 Home and Community Preferences Survey also found that 77% of adults want to remain in their current homes. These figures make practical bathroom access more than a remodeling preference. The 2010 ADA Standards commonly reference a 60-inch turning space for wheelchair users, although private residential projects may follow different requirements. Local codes still control. Manufacturer specifications matter too.

Ron Mace, founder of the Center for Universal Design, described universal design as “the design of products and environments to be usable by all people, to the greatest extent possible.” That principle applies directly to walk in tub clearance. Leave room for opening the door fully, standing beside the seat, and assisting another person. A few inches can change daily safety. Measure twice.

This guide explains how to measure each clearance zone, compare dimensions with the manufacturer’s installation sheet, and identify hidden conflicts before delivery. It also acknowledges an uncomfortable truth: a technically correct measurement can still produce an awkward bathroom. Recheck the user’s mobility, equipment, and real movement pattern before ordering.
How to Measure Walk In Tub Clearance for Installation?

Identify Tub, Doorway, and Bathroom Dimensions Before Measuring

Measuring walk-in tub clearance begins with identifying the tub and its actual installation footprint. Record the tub’s length, width, height, door swing, and required service space. Do not rely only on catalog dimensions. A raised rim, outward-opening door, or side panel can change the usable clearance. I once measured the main shell correctly but missed the handle projection. That small mistake changed the walkway.

Measure every part of the route before planning installation. Check the entry door, hallway, bathroom door, and any sharp turns. Record clear width with the door fully open, not just the frame size. In the bathroom, measure the available floor area, wall-to-wall distance, ceiling height, toilet position, vanity depth, and drain location. Mark baseboards and heating fixtures on your sketch. They often reduce clearance by several centimeters. Keep the tape level and measure each area twice. My first sketch looked accurate, but a second check exposed an uneven wall.

Tips: Use a rigid tape measure and write measurements immediately. Photograph corners and door hinges for reference. Leave room for the installer to tilt, rotate, and secure the tub. Check whether the existing floor can support the filled tub and user. A qualified installer should verify plumbing, access, and final clearances before delivery. Clearance is not just an empty gap. It is working space.

Walk-In Tub Installation Clearance Reference

Measure the tub length and width, the actual doorway clear opening, and the available bathroom floor space before installation. Typical walk-in tubs are about 48–60 inches long and 26–32 inches wide. A 30–36 inch doorway clear opening is commonly used for residential access, while the ADA reference for an unobstructed floor space is 30 × 48 inches. Confirm the exact tub dimensions, swing path, plumbing location, and local code requirements before purchasing or remodeling.

Measure the Entry Route Against the Common 32-Inch Clear Doorway Standard

Measuring walk-in tub clearance begins at the entrance, not the bathroom. A common 32-inch clear doorway standard provides a useful starting point for planning. Measure the open doorway from jamb to jamb, with the door fully removed or opened. Do not measure the door slab itself. Hinges, trim, and handles can reduce usable space.

Continue along the entire entry route. Check hallways, corners, stair landings, and nearby cabinets. A tub may fit through a 32-inch doorway but fail at a sharp turn. Measure the narrowest point in each section. Record ceiling height too, especially when the tub must be tilted upright. Use a tape measure and mark the tub’s approximate length and width on cardboard. This reveals awkward turns before delivery day.

The tub’s packaging may add several inches. Ask the installer for the packed dimensions, not only the product dimensions. Remove obstacles that can be moved, but never assume a tight route will work. I once focused on the doorway and overlooked a radiator beside the hallway. That mistake changed the entire handling plan. Measure twice. Photograph tight areas for the installer. The 32-inch clearance is helpful, but it is not a guarantee for every home. When measurements seem close, obtain an on-site assessment from a qualified installation professional.

Mark a 30-by-48-Inch Clear Floor Area for Safe Tub Access

A 30-by-48-inch clear floor area gives a walk-in tub enough space for safer access. Mark this rectangle before removing fixtures or ordering the tub. Measure from the finished wall, not from unfinished framing. Include tile, trim, and any planned wall panels.

Use painter’s tape to outline the area on the floor. The 30-inch side usually supports entry space, while the 48-inch length allows room for turning and positioning. Check the bathroom door swing, vanity corners, toilet, and nearby grab bars. A door can steal several inches when fully opened. Small conflicts matter.

Keep the marked area flat, dry, and free from loose mats. Measure in several places because older floors may slope or bow. A level and straightedge can reveal problems that a tape measure misses. On renovation projects, installers often discover that a “clear” corner contains a baseboard, pipe cover, or radiator valve. I once overlooked a thin trim piece during a rough measurement; it changed the usable width after finishing. That mistake was avoidable.

Confirm the tub’s actual exterior dimensions, including side panels and access doors. Then compare them with the taped floor area. Local building requirements may call for additional maneuvering space or accessible clearances. A qualified installer should verify the layout before plumbing begins.

Measure twice. Mark once.

Check 60-Inch Turning Space and Required Clearance Around the Tub

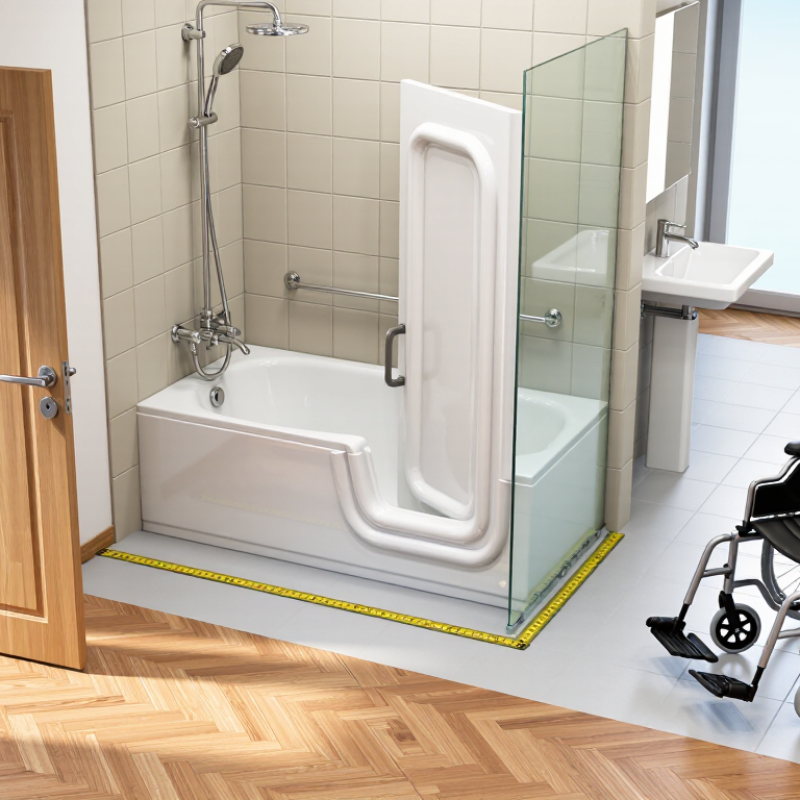
Measuring walk-in tub clearance involves more than checking the tub’s footprint. When accessibility is part of the plan, reserve a clear 60-inch turning space for a wheelchair or mobility aid. Mark this area on the finished floor before removing fixtures. Measure from finished walls, not bare framing. That small difference can change the installation plan. Keep doors, cabinets, and toilets outside the turning space whenever possible.

Measure the tub’s length, width, and entry-door swing with a tape measure. Add working clearance around the seat, controls, and drain access. The exact distance varies. Check the installation guide. Allow enough room for someone to stand, transfer, and open the door without twisting. Confirm that water and waste connections remain reachable after installation. I once considered a narrow gap acceptable. It made later maintenance awkward.

Use painter’s tape to outline the tub and the 60-inch turning area. Then test the route with a walker or full-size cardboard mock-up. This exposes conflicts that drawings can hide. Verify floor strength, doorway width, and threshold height with a qualified installer. Do not rely on catalog dimensions alone. Walls may not be square. Existing plumbing can shift the tub several inches. Record each measurement twice, and confirm local accessibility requirements before work begins.

How to Measure Walk-In Tub Clearance for Installation? — Check 60-Inch Turning Space and Required Clearance Around the Tub

Measurement Area Recommended or Referenced Dimension What to Measure Why It Matters Installation Check
Clear turning space 60 in (1524 mm) diameter Measure an unobstructed circular area on the bathroom floor. Measure between finished surfaces, not unfinished framing. A 60-inch turning circle is a commonly used accessibility reference for wheelchair maneuvering and allows a user to turn without striking walls, fixtures, or the tub. Confirm that the circle remains clear after the tub, vanity, toilet, door swing, grab bars, and trim are installed.
Alternative T-shaped turning space 60 in × 60 in minimum envelope Check the width and length of the T-shaped maneuvering area, including the arms and the central approach. Accessibility standards may permit a T-shaped turning space instead of a full circular space where the layout meets the required geometry. Do not count areas blocked by fixed cabinets, radiators, plumbing fixtures, or a door that cannot remain open.
Clear space in front of the tub 60 in long × 30 in wide minimum reference Measure from the front edge of the tub or seat to the nearest obstruction, and measure the usable width along the tub. This is the accessible bathtub clear-floor-space reference used in the 2010 ADA Standards for accessible bathtub installations. Keep the area usable for approach, transfer, bathing assistance, and opening the tub door without interference.
Transfer-side clearance 30 in minimum clear width reference Measure the unobstructed side-to-side width beside the tub where the user transfers from a wheelchair or walker. A clear 30-inch width supports a more direct transfer and reduces conflicts with nearby fixtures or walls. Check the actual tub seat location, door position, grab bars, controls, and any projecting trim.
Bathroom entry door opening 32 in clear opening reference Measure the clear passage with the door open, from the face of the open door to the opposite stop or frame. A 32-inch clear opening is the accessibility reference commonly used for wheelchair passage through a doorway. Measure the finished opening. Door thickness, hinges, stops, and weatherstripping can reduce the usable width.
Door swing and tub-door conflict No interference with required clear space Sweep the full arc of the bathroom door and the walk-in tub door. Mark both arcs on the floor before installation. A door swing can reduce the turning circle, block the transfer zone, or prevent the tub door from opening fully. Consider a pocket door, an outward-swinging bathroom door, or a layout change if either door overlaps the required clear floor area.
Finished wall-to-wall tub length Verify against the selected tub model Measure the wall-to-wall distance at the floor, mid-wall, and tub rim height. Record the smallest measurement. Bathrooms are often out of square, and the usable opening may be smaller than the nominal room dimension. Allow for wall finishes, waterproofing, shims, service panels, and manufacturer-specified installation gaps.
Finished wall-to-wall tub width Verify against the selected tub model Measure the available depth from the back wall to the front obstruction, including baseboards and casing. The tub shell, plumbing connections, access panel, and side surround may require more depth than the basin alone. Use the tub’s overall installed dimensions, not only its internal bathing dimensions.
Plumbing and service access Follow the installation manual Locate the drain, hot and cold supply lines, shutoff valves, electrical connections, pump, and removable service panels. Access is needed for testing, repairs, cleaning, and emergency shutoff. Concealing service parts behind a wall can make maintenance difficult. Keep required access panels reachable and avoid placing permanent fixtures where they block service components.
Floor loading and levelness Confirm with the tub specifications Check the floor structure, finished-floor condition, slope, and the combined weight of the empty tub, water, and occupant. Walk-in tubs can be substantially heavier when filled. An uneven or insufficient floor can affect door sealing and drainage. Have a qualified contractor verify structural capacity and correct significant unevenness before setting the tub.
Drainage and water management Match the existing drain requirements Measure the drain location, pipe size, trap position, and available slope from the tub outlet to the building drain. A suitable drain layout helps the tub empty properly and reduces the risk of standing water or leakage. Do not rely on flexible extensions or improvised fittings unless specifically permitted by local plumbing requirements and the installation instructions.
Grab-bar and control reach zone Follow applicable accessibility requirements Mark the planned grab-bar locations and measure reach to faucets, shower controls, drain controls, and the emergency release. Controls and support features should be reachable from the intended transfer position without requiring unsafe twisting or overreaching. Verify wall reinforcement, mounting height, control orientation, and the tub manufacturer’s approved locations before closing the wall.

Important: The 60-inch turning circle and 60-inch × 30-inch tub clear-floor area are accessibility design references, not a universal requirement for every residential walk-in tub. Local building and plumbing codes, the tub’s installation instructions, bathroom layout, door configuration, and the user’s mobility needs may require different dimensions. Always verify the final measurements with the local authority having jurisdiction and a qualified installer.

Compare Measurements With the Manufacturer’s Cutout and Installation Specs

How to Measure Walk-In Tub Clearance for Installation

Measure the bathroom opening before ordering a walk-in tub. Record the wall-to-wall width, finished floor length, ceiling height, and doorway width. Measure at several points because older walls are rarely square. Note nearby toilets, cabinets, radiators, and shutoff valves. Small obstacles matter.

Do not compare your measurements with the tub’s outside dimensions alone. Use the manufacturer’s cutout and installation specifications as the controlling reference. Check the required rough opening, side clearance, drain location, water connections, electrical needs, and access space for service panels. The cutout may be smaller or larger than the tub body. Door swing clearance also needs a full floor measurement. A door can open on paper but strike a vanity in practice.

I once trusted a single wall measurement and missed a baseboard projection. That mistake changed the planned position by several centimeters. Recheck every dimension from the finished surfaces, not the framing. Leave the exact clearance stated in the installation guide, even when the space looks generous. Confirm floor strength and drain alignment with a qualified installer. Take clear photos and mark measurements on a simple sketch. Then compare each figure line by line with the current specifications. If one measurement conflicts, pause the installation plan. Guessing here can create costly damage.